Category Archives: Children’s Ministry Articles

How To Make Street Signs, Sign Posts With PVC, Cheap


I divide my kids up by grade. Kindergarten, and 1st through 5th… each have their own section to sit in. I then divide those six groups into two teams (almost like the traditional boys vs girls): 1st, 3rd & 4th vs K, 2nd and 5th. This keeps things pretty balanced and allows me to sit kids of the same age together which builds friendships and helps new kids find friends quickly.

It may sound confusing, but with my Street Signs, it’s super simple for the kids to keep track of where they sit. I’m presenting my rough plans and some photos of the completed project. It’s not a step-by-step by any means… but it should give you enough information to make your own. You could use this idea for pretty much any sign holder you might need. Sure beats paying hundreds of dollars for commercial bases and sign holders.

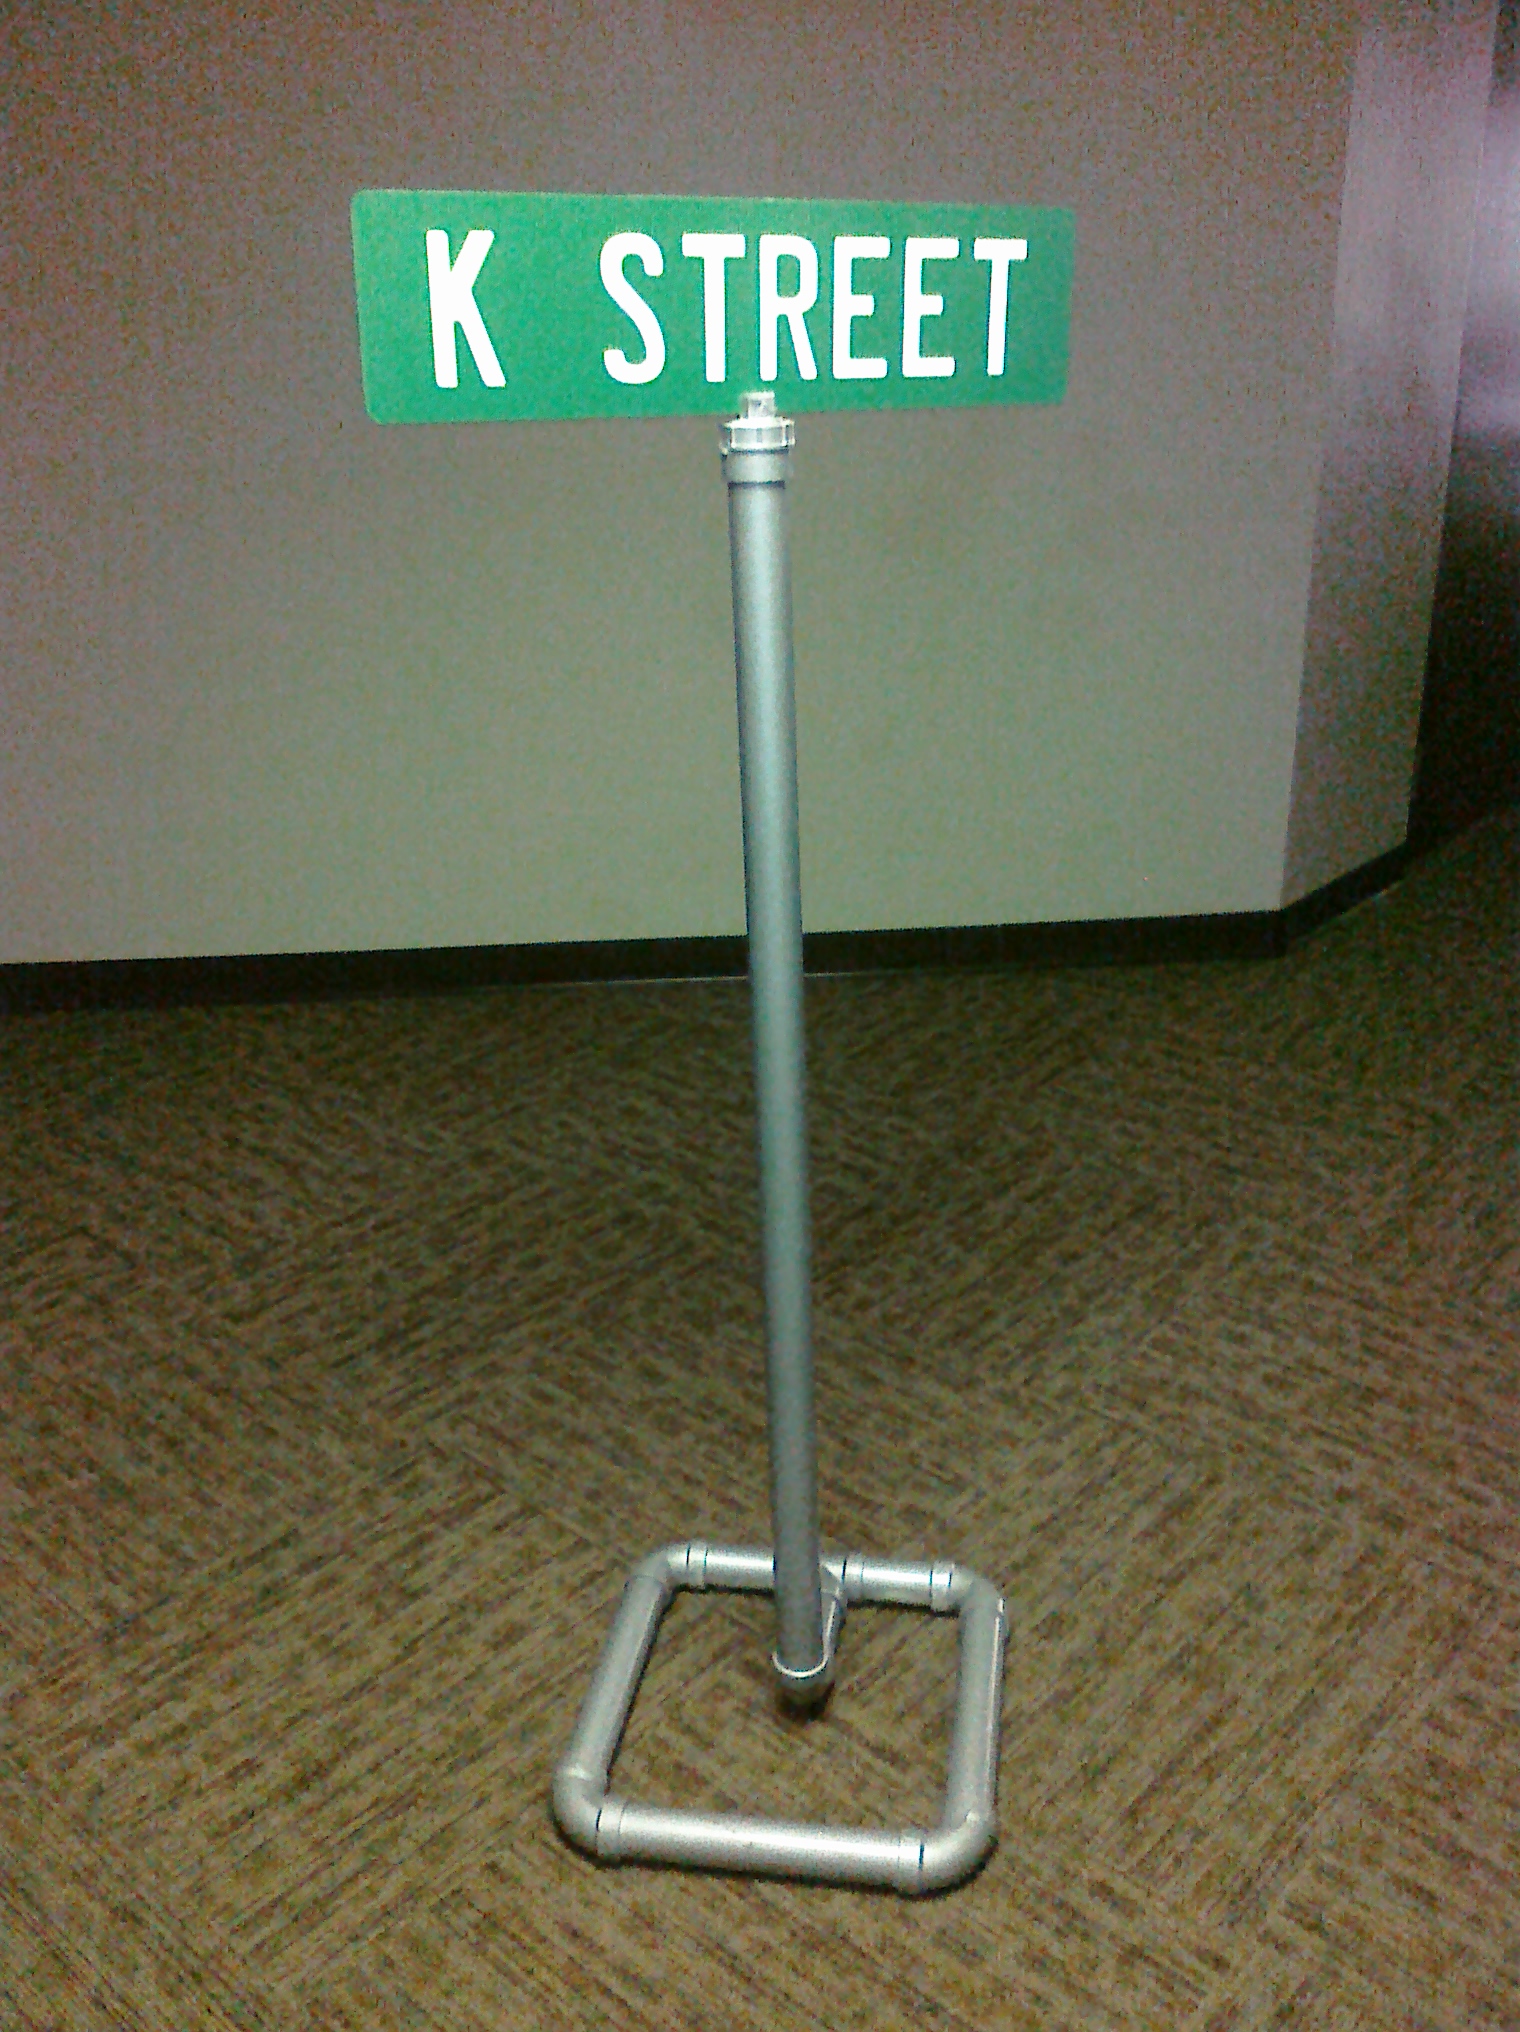
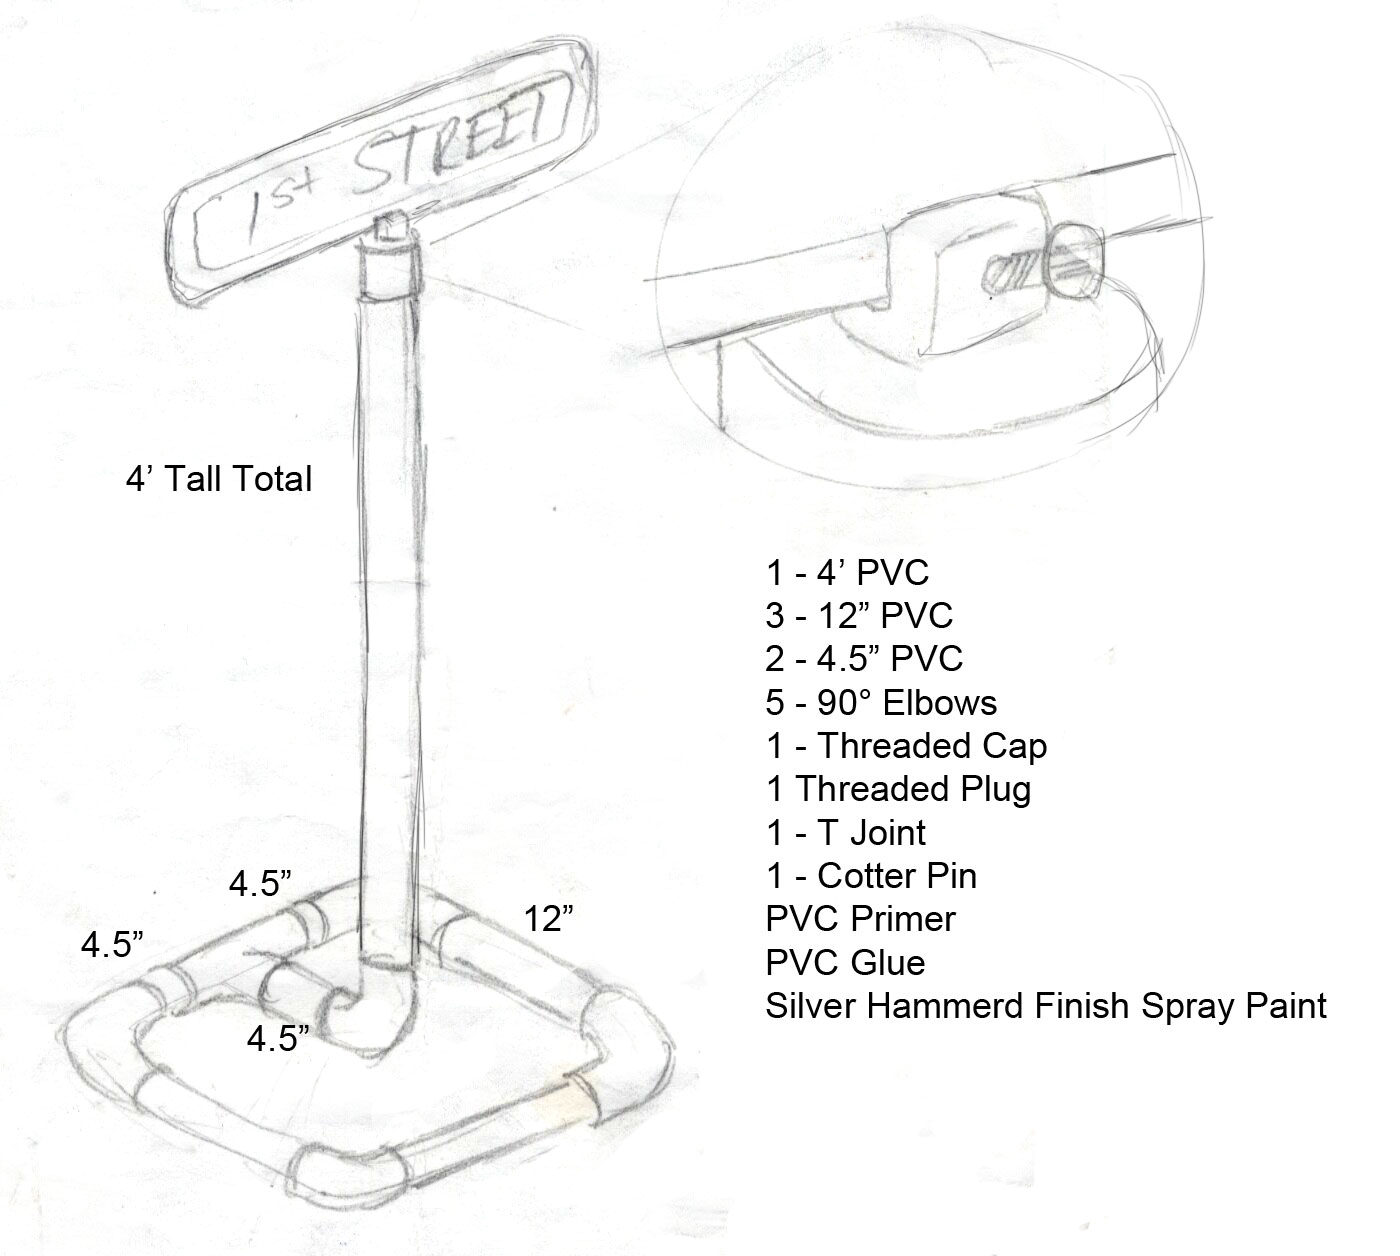
Here’s the completed sign and stand. The PVC was all 1 1/2″ Solid Core PVC Pipe. The signs are Aluminum and I ordered them from a local vinyl cutting sign shop.

Product List (per sign):
1 – 4’ PVC
3 – 12” PVC
2 – 4.5” PVC
5 – 90° Elbows
1 – Threaded Cap
1 Threaded Plug
1 – T Joint
1 – Cotter Pin
PVC Primer
PVC Glue
Silver Hammered Finish Spray Paint

After collecting all of the pieces and cutting them to size, I glued them up according to the plan sketch above. I used a hand-held miter saw to cut a slot about half-way down the top of each Threaded Plug to hold the signs. Then I spray painted the assembled stands. After they dried I slid the sign into the slot and drilled a small hold through the plug and sign. I used a cotter pin to keep the sign fixed to the plug.

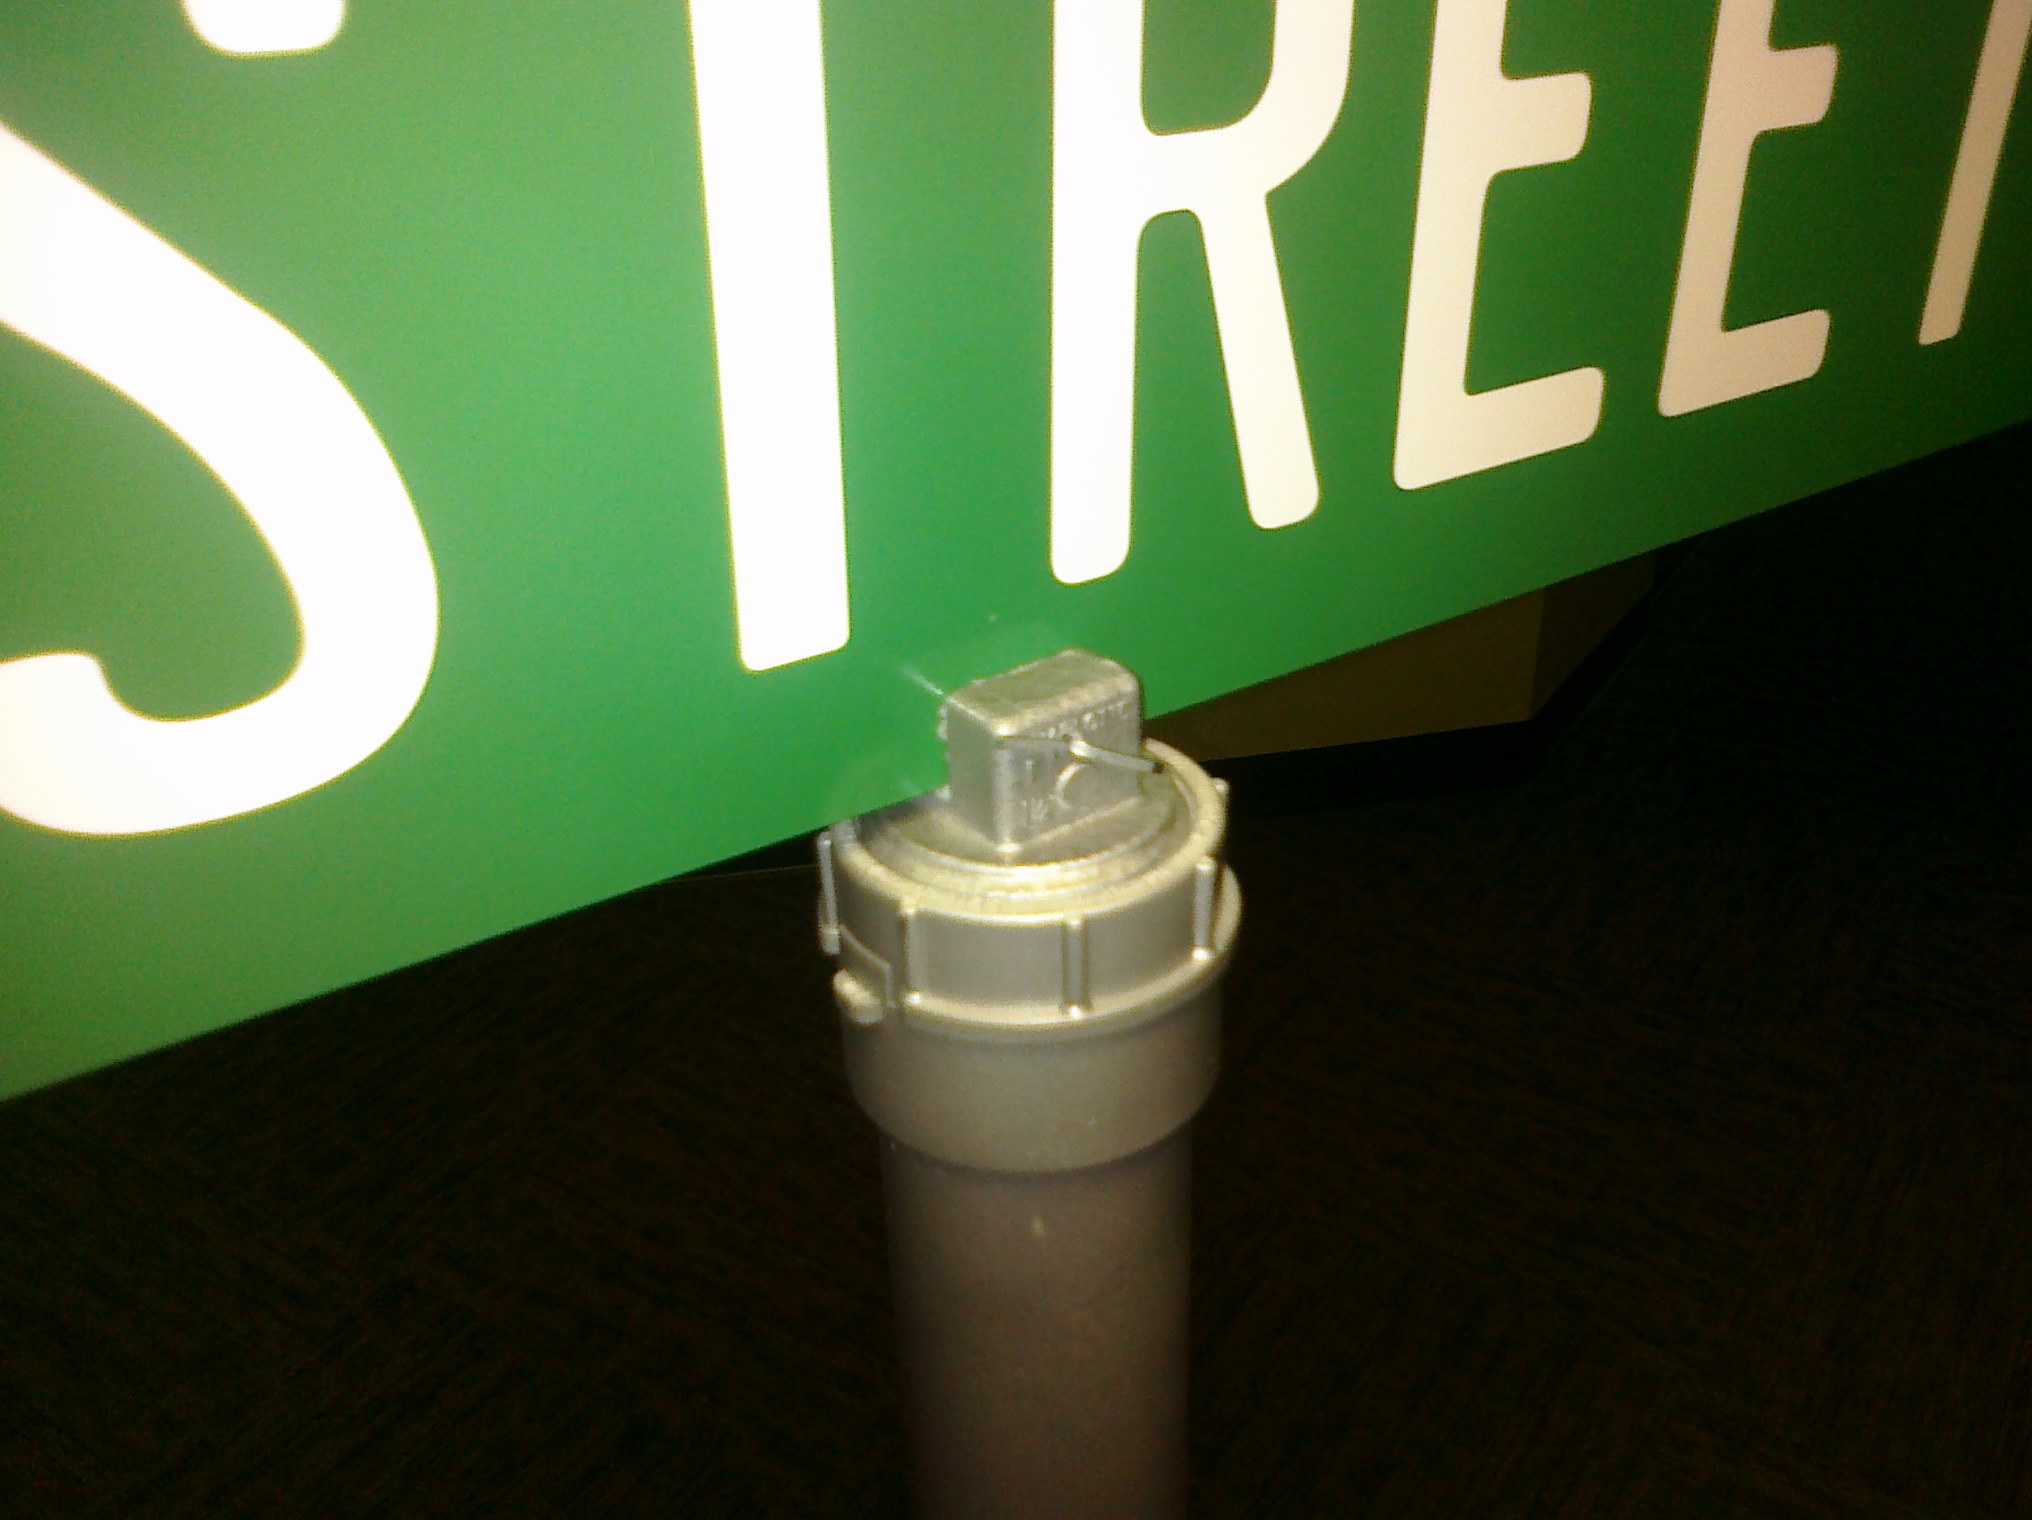
The base of each unit can be removed from the main shaft. The signs can be removed by unscrewing the plug from the threaded cap or by removing the cotter pin. Keeping some of the parts loose allows me to store them easily… or replace broken pieces without having to start completely over. The poles take the most wear and tear because kids like to lean on them… the poles can flex without breaking off from the base… but can easily be tightened with just a little downward force.

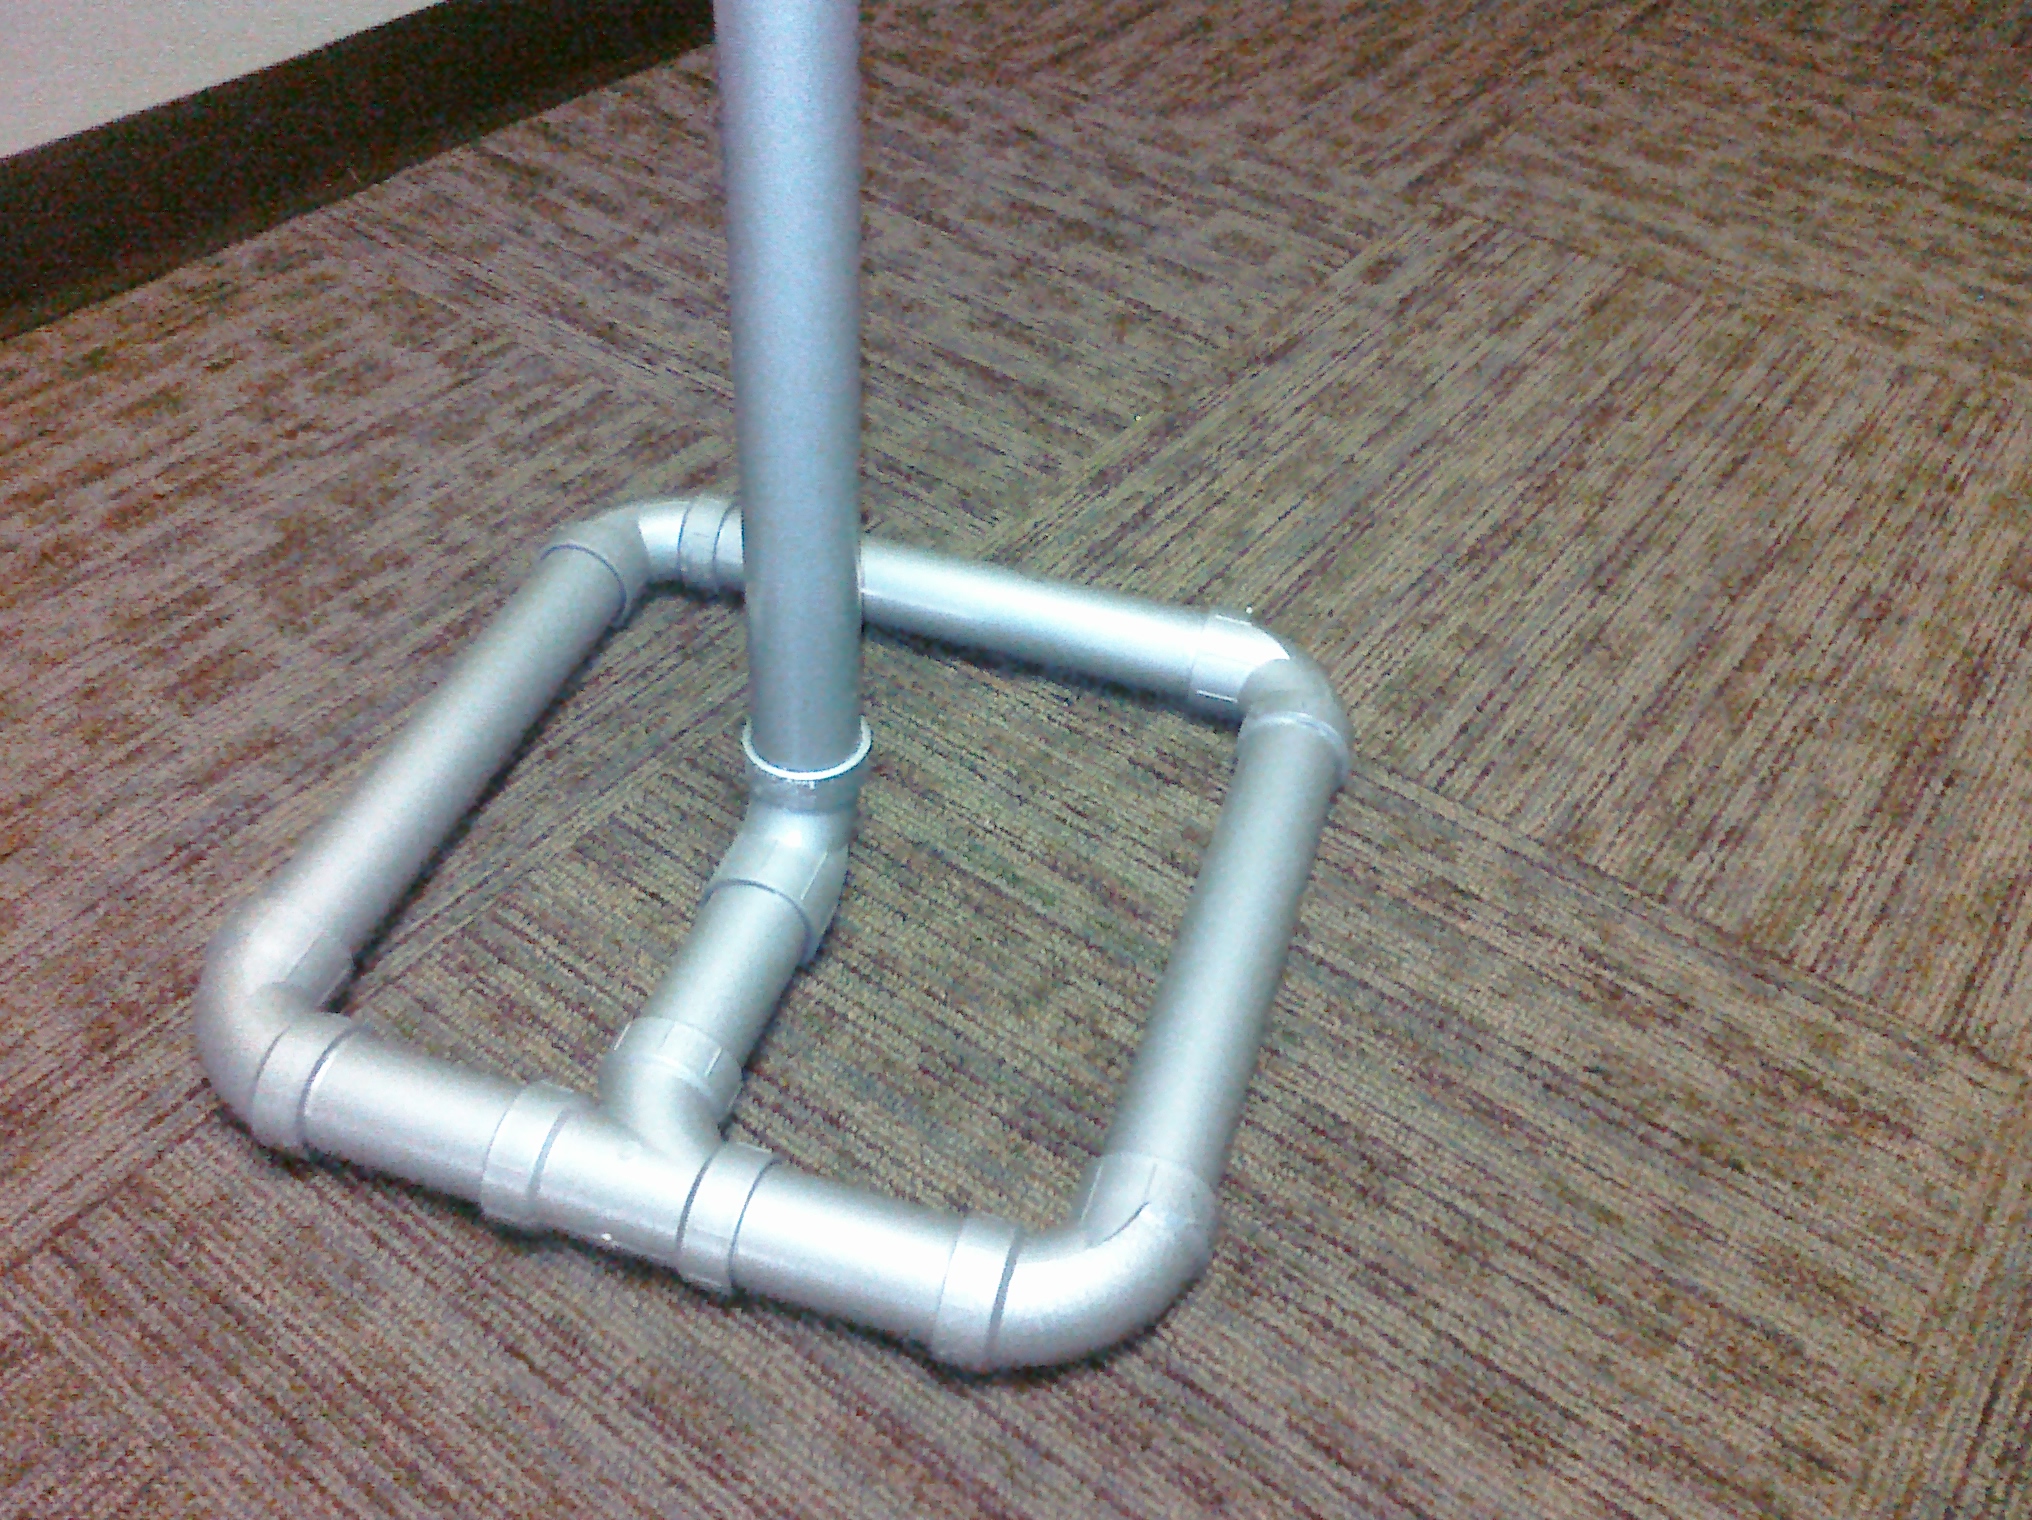
We’ve been using them for about two months now and they still look as good as the first day. The hammered finish spray paint is very tough, sticks well and resists chipping well. They’re very light-weight so they’re easy to carry and won’t hurt a child if they tip over…. not that they ever have. The wide base keeps them upright and secure. This was a successful project and with a relatively low price.

I spent about $90 on PVC and $90 on the vinyl signs, so around $180 total for six signs. Compare that to the quote from the sign shop for their stands and signs at $399 each!

What do you think? I’d love to get your feedback in the comments. If you have any questions, post them and I’ll respond!

Things I’m Big On In Children’s Church

big-exhibit-logo

1. I’m big on being prepared.

Everything should be finished and ready to go before Sunday morning. 90% of frustration alleviation is preparation!

2. I’m big on timeliness.

Each volunteer depends on the others to be at their post on time to serve their role. Parents and Sunday School Teachers depend on us to open the doors promptly. Starting service on time adds predictability which is important to children when establishing order.

3. I’m big on smooth transitions.

I hate downtime. Volunteers who are doing a part of the service should keep their eyes on their schedule and skip ahead. If their segment is coming up, they should be ready (with their team if they have one) and pass me on the steps going up while I’m coming down.

4. I’m not big on unplanned interruptions.

If someone needs the microphone during the service… they need to have asked for it before… or while I’m not on the stage.

5. I’m big on discipline.

I want us to enjoy our time with the kids… and them with us. The way to do that is to maintain an understanding of mutual respect between ourselves and them.

6. I’m big on giving away segments.

I’m not interested in my children’s church becoming the “Pastor James Show”. If there is a leader who would like to assist by taking a segment here and there… or even every week… they only need tell me. Pretty much anything short of the teaching and altar time is available.

Children’s Ministry Names – Some Ideas

I’ve written about Children’s Ministry names before, but that was more of a post about the types of names. This time I’m just going to punch out a list of names for Children’s Church right off the top of my head. I cannot confirm or deny if any of these are original or in use somewhere. These are simply offered out of a desire to help those who are searching for Children’s Ministry Names.

Kid Works – A construction or science theme.

InTune – Music or computer theme.

Megaville – City or superhero theme.

JAM City – Jesus And Me, a city theme.

ChurchName Kids – Put your church’s name and add kids to the end. It works.

Xtreme – Extreme sports theme.

Power House – Electricity or explosion themed.

Young Adventures – Explorer themed.

City Kids or Kid City – City themes.

NRG Zone

Power Source

Sonshine Kidz

Kids Life

Sincity – Just checking to see if you’re reading this. 😉

Kids for Christ

Kids Trek

Disciple Ship – Nautical theme.

Volunteer Seekers – Sorry.

Kids Place

Kid Nation

UpStreet

Kidz Zone

Kid Builders

Camp Kingdom

Kid Power

Kid Planet

Action Kids

Big Steps

iKids

180 Crew

KidStyle

Kids in Training

BootCamp

Camp Rock

TNT

Impact

Christ’s Kids

Young Champions

Submitted by @PerryLyons

Kidsmin

KidsChristClass

Kids for Christ

His Little Ones

Christaloneians

Tykes for Christ

FYI – The logo above was done by me for a Children’s Pastor via my website http://drawyouapicture.com. If you need a low-cost children’s ministry logo, check it out.

Funny or Memorable Things To Say To Kids

Funny OR memorable… let me explain before we dive in. I had someone tell me once, “If you can’t be good… be memorable!” A creed all underachievers can live by!

Here are some random things I say to kids to help break the ice when I meet them. Some are funny… others are just memorable. Some are one liners, others take a bit of setup.

When you’re meeting a child or checking them in… after you’ve asked their name and age… find out if they’re married.

When guessing a child’s age… never try to be accurate… guess at least two years higher than what you’re thinking. You’ll impress them because every child wants to be bigger.

Ask groups of siblings who’s got the messiest room… who eats the most… who runs the fastest. Fingers will be flying.

With twins… always ask who’s oldest. Then who’s smartest. 😉

All my kids know that they aren’t allowed to get married till they’re 35.

After service when kids are heading out with their parents, tell them, “Take a nap and clean your room!” You’ll get an amen from Mom.

Tell Mom that we decided that her child was so good in children’s church we decided that he/she could drive home today.

Tell a large group that if they don’t listen… we’re canceling everyone’s birthday! (with a huge smile of course!)

When a child tells me it’s their birthday, I congratulate them, ask them their age… and what did they get ME!

Before and after Christmas, make it clear that if anyone gets any (fill in your favorite stuff here… for me it’s Buzz Lightyear stuff) they can bring it to you rather than return it to the store.

What one-liners and jokes do you use to play with your kids?

Home Grown Object Lessons

object

By way of a follow-up to yesterday’s post on Creating Your Own Object Lessons, here are a few illustrations I’ve created using that method:

The dual-purpose of the Christian: To Love God and Love Others – A hammer has two jobs. Hammering nails and pulling them out. You can use hammers for a lot of other things… but they were created for only two things… just like us. Continue reading

Creating Your Own Object Lessons

ideas

Books are expensive. Especially when you’re in a position where the church copier has a bigger budget than you do (and nobody expects the copier to sell candy bars). There are tons of books full of object lessons out there but even aside from the cost… how much time do we spend pouring through them looking for that one perfect illustration for the point we want to make? A lot!

What I’ve found is that an object lesson that I create myself, though it may not be as fancy and cool, takes less time, money and actually does the job much better… because it fits perfectly. I also believe God blesses such creative endeavors.

Before you convince yourself you could never be creative enough to come up with your own object lessons and quit reading… let me spill out the process I use to help illustrate a bible point or idea.

1. Make a Point

Simplify and distill your idea into a short phrase. Rather than, “God loved you so much that he sent his Son Jesus Christ to die for you on the cross to save you from you sins so you wouldn’t have to pay the price for your own sins and suffer eternal spiritual death” you might distill it down to, “Jesus took your place” and illustrate that.

2. Ask Yourself: What Does The Same Thing In Real Life?

Object lessons use objects to illustrate a point… so our next step after getting our point is to find an object that accomplishes a similar task or fulfills a similar function. Continuing with our “Jesus Took Your Place” point you might use two pieces of paper, damage one and start to throw it away. Then take a second sheet that is flawless and throw it away instead. It’s the same thing… but with objects. It’s not fancy… but it works.

3. Preach The Lesson Not The Object

The biggest mistake I see children’s ministers make with object lessons is they get so focused on the object that they forget about the lesson they’re actually teaching. That’s why I’m not a huge fan of spending a lot of money on pre-made props and illusions… it puts way to much emphasis on the wrong part of the lesson. Jesus used objects like nobody else… even if he didn’t happen to have them on hand… he was the master… but they were normal, obvious, everyday things. The focus was the message, not the story or illustration.

That’s how I do it! I’ll be honest. It’s not easy… but it’s the best investment of time you can make. Give it a shot this week. Ask God to help you… put yourself in a place where he must… and he will.

Questions? Input? Post them in the comments!

How I Create Illustrations (Object Lessons)

I wrote this up for one of my Children’s Church Volunteers so I thought I’d share it here.

Here’s how I do Illustrations

  1. Start with the main point and find a sub-point that needs to be illustrated. (ie: Putting God first is a daily choice.)
  2. I make sure that my point is true (back-able by scripture and/or common sense), applicable to any age-group anywhere in the world.
  3. I make a final, complete statement of my point: (ie: We must choose to put God first daily by choosing to obey God.)
  4. I find an everyday situation, item, or whatever that kids can relate to that naturally represents the same idea. (ie: eating healthy is a choice, getting ready for school but allowing video games to make you late, dedication to a sport requires sacrifice)
  5. Work that illustration into a lesson. Sometimes I talk about the biblical truth, then illustrate. Sometimes I lead with the illustration and then draw parallels to the point. What works best is to mix them both… then have a quick, concise ending that punches them with the desired response. (ie: Putting God first is a daily thing… every day we must choose to obey God and follow his ways, no matter what.)
  6. After I’m done I make sure I’m saying what I want to say. I view it from the child’s perspective. Will they ‘get’ it?

My rule is, “Don’t start with the object, start with the lesson”. “Don’t teach the object… use the object to teach the lesson”.