 Updated 12-07-2007
Some of our listeners, and even a few of our guest-hosts, have asked how we do what we do. I finally figured out that I needed to create a post that I can refer them to rather than giving very short email responses that don’t really help anyone.
First, the mandatory disclaimer. This is not THE way to do it… it’s just how I do it. It works for me. If you have a better way, please let me know.
Second, thanks to Michael Murloc (formerly of The Weekly Murloc) and Scott Johnson (of ExtraLife Radio) for all their help. Michael shaved three months off my learning curve and Scott’s emails helped me tremendously when we had to shift to being a Skype-cast. Also thanks to my bud Vance who turned me on to the whole iPod, iTunes, podcasting thing to begin with.
What I Use
Recording & Mixing Software
Adobe Audition 2.0 (to record, mix podcasts)
SoundByte (computerized cart system to play segments and stingers in realtime)
WinLame (to encode wav to mp3)
iTunes (to write id3 tags)
Skype (when co-host is not in the same room)
Graphics Software
Corel Draw & PhotoPaint (to create weekly custom graphics)
Hardware
Dell Inspiron 1720 Laptop
2nd Dell Laptop (just enough power to get on the Internet and run Skype)
M-Audio Mobile Pre USB (external sound card & mixer)
$50 Condenser Mic
Headphones
Plosive Filter
Cheap $17 headset w/mic (in case I’m not in my office studio)
Web Hosting & Software
Libsyn (to host my podcasts) Literally the best & cheapest place to host your media files. Basic service costs $5 a month. Unlimited bandwidth.
GoDaddy (url registration, hosting) $8 per year for your url (or less with promo codes). $3.99 a month hosting. Can’t beat it.
WordPress (awesome blogging software) If you host with GoDaddy, they have a free service that installs it automatically.
PodPress (plugin for WordPress that generates feeds and puts a player on your website)
How I Do It
Solo Recording
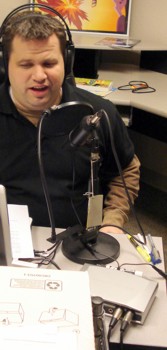
I just plug in the m-audio box and using my mic and record using Audition. In emergencies I’ll use my cheap headset mic plugged directly into the mic input on the laptop.
Skype Recording
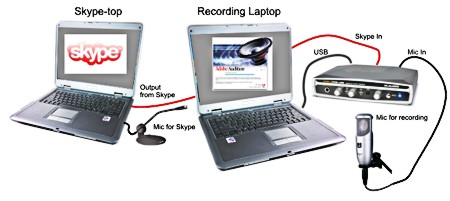
This is a bit more complicated. I use two laptops. One just runs Skype. The other runs and records with Audition. Skype-top’s output (headphone jack) is plugged into the M-Audio box as Input 2. My Condenser mic is plugged into the M-Audio box as Input 1. In Audition I record using the Multi-track View. Track one is set to record the left channel from the M-Audio box (my vocals). Track two is set to record the right channel (skype). Track three is set to record off the laptop’s soundcard. I can then set seperate volume levels for each track. The guest-host(s) hear me through a regular old computer mic attached to the skype computer. Since SoundByte plays through the recording laptop’s soundcard, whatever I play is recorded to track three, and also plays through the laptop’s speakers and can be heard to my guest-hosts as well.

Mixing
First step is to remove any background noise. Of course it’s best not to have any… but no matter how quiet it is where you’re recording, and especially if you’re using Skype, there’s going to be at least some soundcard noise on your track. The trick is to select just a bit of ‘silence’ off your track. I find a spot where both tracks are quiet, then use Auditions Noise Reduction filter to take out that noise. Be careful with this. If you have a lot of background noise, your voice will begin to sound like a robot. I do this for each of the vocal tracks.
I then adjust the volume of each track in Multi-Track view. Using the volume bar on each waveform I can tweak the levels even further. I typically pull down the volume of the vocal tracks when I play stingers and bumpers. If I have any voicemails I didn’t have time for or promos to play, I’ll drop them in at this point and adjust their volume individually.
The important thing to note before we mix down our session is to make sure all of your various wavforms (voicemails, your voice track, music, sound effects, etc.) sound (in your ears) the same volume. In the past I used to look at the peaks of the wav files or the levels of the volume sliders but none of that matters if your ear is telling you something is louder than it should be.
After I’ve got everything right, I mix down all the wav files to a stereo wavform. If you’re not using a lot of music, you might want to mix to mono. You’ll just be doubling the size of your mp3 for no reason. I look at my wavform. Are the peaks of the wavform about the same all across? Are there any obvious parts that look to loud or to quiet. I check them in my ear to make sure. If they’re wrong, go back and fix the levels and mix it down again. Early on I would repeat this step several times before I got it right.
Now it’s time to squeeze as much volume out of our audio as possible. Normalize the wavform to -1 db. Then you need to run Dynamics Processing on your wavform. What this does is limit the distance between your quietest points and loudest points in your wavform. I use one of Adobe’s presets (-12 db). The end result is you have a wavform that folks aren’t turning up on the quiet times and turning down when your voice is loud. Then I use I use Hard Limiting to bring the total overall volume to -.5 db. I add 10 seconds of silence to the end if the file and save it as a new wav.
Encoding
I then launch WinLame and encode the wav file into an mp3. I use the default WinLame encoder. I use the Portable preset. I have it set to save the mp3 in the same directory I had my wav file in. Easy to find that way.
After it encodes, I find the new mp3 file in Explorer, right click and select Open in iTunes. I right click on the file in iTunes and select Info. This is where I fill out the Episode, Podcast Title, Author, Year, Notes, and the individual graphics I do for each show (you can just use one if you’d like). When you click OK, iTunes writes id3 tags to your mp3.
Uploading
Right click on your mp3 in iTunes and select ‘Show in Windows Explorer’. That way you’re sure to upload the file you just modified. I then launch Filezilla and upload my mp3 to Libsyn.
Libsyn has a built in blog that you can use to publish your shows. It will also generate your feed that you can submit to iTunes. I chose to host my website and feed under my own url. I suggest you do the same. That way no matter how many times you switch hosting servers, your feed will always be the same (ie: www.yourdomain.com/feed=podcast).
In Libsyn under the Media Files tab I select my new episode, right click on the ‘direct download’ link in the left sidebar, and copy the link. Then in WordPress write a new post and add that link to the PodPress portion of your post. There are several other settings like Title, file size and the length of your podcast. Check the PodPress website for more info. When you’re done, post that sucker!
I then go back to iTunes and refresh my podcasts to make sure my latest show downloads from the feed. I listen to a bit, check the artwork, titles, spelling, etc. If every thing’s good… I’m all done!
Conclusion
I know for a fact that I haven’t answered every question. But this article will definitely shave some time off your learning curve. If you have any questions not answered here, post a comment or email me and I’ll add it in.